Resumen de contenidos
This Administrator’s Manual, will teach you how to ✅ Configure Gigaset C530 IP. Optimize your handset with the most advanced features in a simple way. 🤓 Keep reading!
How to configure the IP address of the base station in the Gigaset C530 IP LAN?
Requirement: The station must be connected to a router or PC.

In order for the LAN to «recognize» your phone, an IP address is required.
The IP address can be assigned to the phone manually or automatically (from the router).
- If dynamic assignment is chosen, the router’s DHCP server automatically assigns an IP address to the phone. The IP address may change depending on the router’s configuration.
- If manual/static assignment is chosen, you will be the one to assign the phone a fixed IP address. This may be necessary depending on the structure of your network (e.g., if you connect the phone directly to a PC).
Note.
To perform dynamic IP address assignment, the DHCP server must be enabled on the router. Please refer to the router’s instructions for use.
![]()
![]()
![]()
![]() Accept
Accept ![]()
![]() System
System ![]() OK
OK ![]()
![]() Local Network
Local Network ![]() OK
OK ![]() In case the system PIN is not 0000: enter the system PIN
In case the system PIN is not 0000: enter the system PIN ![]() OK
OK
IP address type: ![]()
![]() Static/Dynamic
Static/Dynamic
- With Dynamic IP Address Type:.
The following fields show the current configuration that the phone has obtained
from the router. This configuration cannot be modified. - With Static IP Address Type:.
In the following fields you must manually set the IP address and subnet mask of the phone as well as the
subnet mask of the phone, as well as the standard gateway and DNS server.
IP Address: ¤ Enter the IP address (overwrite the current settings).
The default is 192.168.1.2.
- With Dynamic IP Address Type:.
- Subnet Mask:
 Enter the subnet mask (overwrite the current setting).
The default is 255.255.255.255.0. - Serving as the default.
- DNS Server: Enter the IP address of the preferred DNS server.
When the connection is established, the DNS (Domain Name System) server converts the symbolic name to the IP address of the preferred DNS server.
server (DNS names) into the public IP address of the server.
public IP address of the server.
You can enter the IP address of your router here. The router forwards address queries from the phone to the DNS server. The default is 192.168.1.1. - Standard gateway: Enter the IP address of the standard gateway ( ¢ p. 162).
The local network is connected to the Internet via the standard gateway. This is usually your router. Your phone needs this information to be able to access the Internet. The default is 192.168.1.1.
Save
Note.
You can also make the settings for the local network through the Web configurator (we will see it in another section of this article).
How to configure the Gigaset C530 IP VoIP connections?
Note.
If VoIP data is loaded via the automatic configuration on your phone, the VoIP wizard will not be available. In this case, manual changes of the VoIP settings are not possible. .
You can configure up to 6 VoIP connections on your phone, i.e. you can assign up to 6 VoIP phone numbers to your phone.
For each connection you must have an IP account (VoIP account) with a VoIP provider.
The access data for this IP account must be stored in the phone. To do this, you will be assisted by the
VoIP wizard.
How to start the VoIP wizard on Gigaset C530 IP?
![]()
![]()
![]()
![]() OK
OK ![]()
![]() Telephony
Telephony ![]() OK
OK ![]()
![]() VoIP Wizard
VoIP Wizard ![]() OK
OK
The following prompt is displayed on the screen:

For each run of the VoIP wizard you can configure or change the configuration of a VoIP connection (IP account).
![]() Start the VoIP wizard again if you want to configure or change the configuration of another VoIP connection.
Start the VoIP wizard again if you want to configure or change the configuration of another VoIP connection.
Note.
You can also configure and manage VoIP connections using the Web configurator later in this article.
How to perform the automatic update of the VoIP provider settings in Gigaset C530 IP?
After the first download of the VoIP provider settings, your phone will check daily if a new version of your VoIP provider files is available on the configuration server on the Internet.
The VoIP settings have been loaded by the automatic configuration.
If new configuration data is available, it is automatically (without warning) loaded into the phone.
How to perform manual VoIP configuration with VoIP wizard on Gigaset C530 IP?
If new provider data is available, the message New profile available is displayed on the idle screen of the handset.
![]() Confirm the query with Yes.
Confirm the query with Yes. ![]() If necessary, enter the system PIN.
If necessary, enter the system PIN. ![]() OK.
OK.
The updated data from your VoIP provider is downloaded and saved on the phone.
If you answer the query with No, the phone will go to idle state. Your phone will no longer remind you of this new profile. The message will only be displayed again when a newer version of the provider’s own parameters than the rejected one is available.
A profile update is only initiated if no other profile or firmware update is currently in progress.
How to assign the send and receive connections to the internal line user in Gigaset C530 IP?
If you have configured multiple connections for your phone system, for each internal user you can:
- Assign it a sending connection or allow to select the connection in case of an external call (line selection).
external call (line selection). - Assign one or more receive connections. Only calls that accept one of the assigned connections
that accept one of the assigned connections are signaled in the equipment.
How to assign send connection in Gigaset C530 IP?
Requirement: You have at least one VoIP connection configured on your phone.
![]()
![]()
![]()
![]() OK
OK ![]()
![]() Telephony
Telephony ![]() OK
OK ![]()
![]() Broadcast Connections
Broadcast Connections ![]() OK
OK
A list of the wireless terminals is displayed.
![]()
![]() Select the wireless terminal to which a new send connection should be assigned.
Select the wireless terminal to which a new send connection should be assigned.
![]() OK
OK
![]()
![]() Select a connection as sending connection. All configured connections with the name you have set are displayed.
Select a connection as sending connection. All configured connections with the name you have set are displayed. ![]() Save.
Save.
If more than one connection is configured, Always select is additionally offered.
You can then select for each call the connection via which the communication is to be established.
The Gigaset.net connection is not included in the selection for sending connections. The Gigaset.net numbers (suffix #9) are automatically selected through Gigaset.net.
Note.
If you delete or disable the send connection of a wireless terminal, it will be assigned the fixed network connection as the send connection.
How to assign receive connection(s) in Gigaset C530 IP?
Requirement: There are several connections configured for your phone.
![]()
![]()
![]()
![]() OK
OK ![]()
![]() Telephony
Telephony ![]()
![]() Reception connections.
Reception connections. ![]() OK
OK
The users of the internal line (mobile terminals) are displayed.
![]()
![]() Select the users of the internal line for which the assignment of the receiving connections is to be changed.
Select the users of the internal line for which the assignment of the receiving connections is to be changed. ![]() OK.
OK.
All configured connections and the Gigaset.net connection are displayed.
![]()
![]() Select Yes if the corresponding connection is to be the receiving connection of the internal line user. Select No if it is not to be any receive connection.
Select Yes if the corresponding connection is to be the receiving connection of the internal line user. Select No if it is not to be any receive connection.
![]()
![]() Switch to the next connection.
Switch to the next connection.
![]() Repeat the steps for each connection.
Repeat the steps for each connection. ![]() Save.
Save.
Notes.
- If a new connection is configured, it will be assigned to all users on the internal line and to AutoCont. 1 as the receive connection.
- If a connection is not assigned to any internal user as a receive connection, calls are not signaled on this connection.
How to update firmware of the Gigaset C530 IP phone?
If necessary, you can update the firmware of your phone.
By default, firmware updates are downloaded directly from the Internet. The corresponding Web page is predefined in the phone.
Requirement:
- The phone is connected to the Internet (i.e. connected to a router)
- The phone must be in idle state, i.e.: It is not being used for calling, no internal connection is established between registered wireless handsets, and none of the handsets have the base station menu open.
How to manually start the Gigaset C530 IP firmware update?
![]()
![]()
![]()
![]() OK
OK ![]()
![]() System
System ![]() OK
OK ![]()
![]() Update Firmware
Update Firmware ![]() OK
OK ![]() Enter the system PIN.
Enter the system PIN. ![]() OK
OK
The phone establishes a connection to the Internet. ![]() Start the firmware update with Yes.
Start the firmware update with Yes.
Notes.
- Depending on the quality of your DSL connection, the firmware upgrade may take up to 6 minutes.
- Updating from the Internet checks if a newer firmware version is available. If not, the operation is cancelled and the corresponding notification message appears.
How to do an automatic Gigaset C530 IP firmware update?
Your phone checks daily if a newer firmware version is available on the configuration server on the Internet. If there is, the message New firmware available appears on the idle screen of the handset.
![]() Press the Yes softkey to confirm the question. The firmware will be loaded on the phone.
Press the Yes softkey to confirm the question. The firmware will be loaded on the phone.
Note.
If at the moment when the phone should check for new firmware, it is not connected to the Internet (e.g. because the router is disabled), the check will be performed when the phone reconnects to the Internet.
The automatic version check can be disabled with the Web configurator.
How to reboot the Gigaset C530 IP base station?
![]()
![]()
![]()
![]() OK
OK ![]()
![]() System
System ![]() OK
OK ![]()
![]() Rbase reboot
Rbase reboot ![]() OK.
OK.
The base station restarts. This process takes approximately 20 seconds.
Where to consult the MAC address of the Gigaset C530 IP base station?
Depending on the structure of your network, you may need to enter the MAC address of the base station, e.g. in the router’s access list. You will be able to look up the MAC address on the wireless terminal.
![]()
![]() * # Q 5 # 2 0 The MAC address is displayed.
* # Q 5 # 2 0 The MAC address is displayed.
Back to idle state: ![]() Back.
Back.
How to reset Gigaset C530 IP to factory default settings?
Have you ever needed to factory reset your Gigaset C530 IP phone and don’t know how to do it? This situation will have arisen to you for several reasons:
- You don’t remember the password.
- You are going to give the terminal to someone else.
- The phone is very slow, the battery lasts very little or even turns itself off.
- The terminal has a virus.
- You have lost access to the wireless dock due to network error.
- The phone memory has run out and won’t allow you to save any more contacts.
Every wireless phone provides us in the terminal settings the factory reset function (factory reset) or, what is the same, format it. But this action entails the loss of all the information contained in the phone.
Remember that the Gigaset C530 IP phone consists of a wireless base and one or more handsets, allowing up to 6 devices to be connected.
How to reset Gigaset C530 IP to factory default from the phone?
- Open «Menu»
- Enter «Configuration»
- Access the «Base» / «System»
- We give to «Reset base» and press «OK»
When we have done those steps, all the individual settings will be reset and it will be as newly manufactured the terminal.
What if the phone has lost the connection to the wireless base, how do we do it?
How to reset Gigaset C530 IP to factory default from the cradle?
- We must unplug the power supply from the power socket of the base (the black square with the button).
- Hold down the search key on the base station (the button in the center).
- Plug the power supply back in without releasing the button.
- Press and hold the search key on the base station for about 15 to 20 seconds until the key starts to flash.
Once this process is finished, it will be reset to factory defaults. In addition, all the contents of the hardware memory will be deleted and all the phones will be deregistered. And finally, the system code will be reset to 0000.
Once you have reached the end of the process of formatting your Gigaset C530 IP phone you will be able to use it again.
How to connect a repeater to the Gigaset C530 IP?
With the Gigaset repeater you can increase the reception range of the Gigaset handset.
The function and configuration of your repeater depends on the repeater model used. The repeater model can be identified by the article code on the device label:
Gigaset Repeater (prior to model 2.0): S30853-S601-….
Gigaset 2.0 Repeater: S30853-S602-…
More information can be found in the user manual of the repeater or on the Internet at www.gigaset.com.
How to connect a Gigaset repeater (prior to model 2.0) to Gigaset C530 IP?
Requirements:
- The ECO DECT Maximum Range function is activated.
- The ECO DECT No radiation function is deactivated.
- Encryption is disabled:

 OK
OK  System OK Encryption Change (
 disabled)
How to register a Gigaset repeater prior to 2.0 for Gigaset C530 IP?
![]() Connect the repeater to power.
Connect the repeater to power. ![]() Press the registration/paging key on the base station longly (about 3 seconds).
Press the registration/paging key on the base station longly (about 3 seconds). ![]() The repeater is automatically registered.
The repeater is automatically registered.
You can register up to 6 Gigaset repeaters.
How to connect a Gigaset 2.0 repeater to Gigaset C530 IP?
How to register a Gigaset 2.0 repeater to Gigaset C530 IP?
![]() Connect the repeater to power.
Connect the repeater to power. ![]() Press the registration/paging key on the base station longly (about 3 seconds).
Press the registration/paging key on the base station longly (about 3 seconds). ![]() The repeater is registered automatically.
The repeater is registered automatically.
You can register a maximum of 2 Gigaset 2.0 repeaters.
The ECO DECT Maximum range function switches on and No radiation off. The settings cannot be changed as long as the repeater is registered.
How to deregister a Gigaset 2.0 repeater for Gigaset C530 IP?
![]()
![]()
![]()
![]() OK
OK ![]()
![]() System
System ![]() OK
OK ![]()
![]() Repeater
Repeater ![]() OK
OK ![]()
![]() Select repeater
Select repeater ![]() Can. reg.
Can. reg.
How to configure Gigaset C530 IP via the web configurator?
In this section, we will explain how to configure Gigaset C530 IP in all possible functions achievable through the web-based administration panel.
The web configurator of your Gigaset phone allows you to make phone settings conveniently on your PC.
- You can make settings that are also carried out via the handset alternatively via the Web browser of your PC, e.g. configure VoIP connections, carry out firmware updates or start the Eco mode.
- You can also make additional settings that are not possible with the handset, e.g. special requirements for connecting the phone to a company network or influencing the voice quality of VoIP connections.
- You can store data in the base station that is required for access to certain services on the Internet. These services include access to public and private online telephone directories, the mail inbox server of your e-mail account, as well as date and time synchronization with a time server.
- You can save data on the base station that is required for access to certain services on the Internet.
- You can save data from your phone (from the base station and wireless handsets) to files on your PC and load it back into the phone in case of failure.
The following is a list with the Web configurator functions and the navigation paths to the Web configurator pages, where the functions are available.
A detailed description of the Web pages and the required entries can be found in the online help of the Web configurator.
Pay close attention to the following sections to configure C530 IP without difficulty.
How to connect the PC to the Gigaset C530 IP phone Web configurator?
Requirements:.
- A standard Web browser is installed on the PC, e.g. Internet Explorer version 7.0 or higher, Firefox version 3.5 or higher or Apple Safari version 3.x.
- The phone and the PC are connected to the Gigaset C530 IP phone.
- The phone and PC are connected to each other directly via a router. An available firewall configuration enables communication between the PC and phone.
You have two options for connecting your PC to the phone’s Web configurator:
- through the IP address of the phone on the local network;
- via the Gigaset-config service when the phone and the PC are connected to the Internet;
Notes.
- Depending on your VoIP provider, you may not be able to modify some settings of the Web configurator.
- The phone does not lock while you perform configuration through the Web configurator. Simultaneously you will be able to make calls with the phone or change the configuration.
- While connected to the Web configurator, the Web configurator remains locked to other
users. Multiple access is not possible simultaneously.
How to establish connection using the Gigaset C530 IP address in the Web Configurator?
![]() Determine the current IP address of the phone on the handset:
Determine the current IP address of the phone on the handset:
The current IP address of the handset is displayed on the display of the wireless terminal by briefly pressing the registration/paging key on the base station.
The IP address of your handset can be changed once dynamic IP address assignment is enabled.
Caution.
If one of the four parts of the IP address contains leading zeros (e.g. 002), they must not be entered in the address field of the Web browser. Otherwise, the Web browser will not be able to establish a connection to the Web configurator.
Example: The IP address 192.168.002.002.002 appears on the phone. In the address field
you must enter 192.168.2.2.
![]() Open the web browser on the PC.
Open the web browser on the PC.
![]() In the web browser address field, enter http:// and the current IP address of the phone (example: http://192.168.2.2).
In the web browser address field, enter http:// and the current IP address of the phone (example: http://192.168.2.2).
![]() Press the return key.
Press the return key.
A connection to the phone’s Web configurator will be created.
How to establish a connection via Gigaset-config on Gigaset C530 IP?
To configure Gigaset C530 IP by establishing connection via Gigaset-config, follow the steps below.
Requirement: The PC and the phone are connected to the Internet.
![]() Open the web browser on the PC.
Open the web browser on the PC.
![]() In the web browser address field, enter the following URL: http://www.gigaset-config.com
In the web browser address field, enter the following URL: http://www.gigaset-config.com
![]() Press the return key.
Press the return key.
You will receive a message that the connection is being transmitted to the phone.
In case there are several Gigaset telephones accessible via the Internet connection, you will be asked which of these telephones you want to be transmitted to.
After successful transmission, the Sign in web page of the web configurator will appear in the browser.
Note.
The connection between the PC and the Web configurator is local (LAN connection). Only the connection is established via the Internet.
How to log in / log out of the Web configurator to configure Gigaset C530 IP?
Requirement: The PC and the phone are connected to the Internet.
How to set the interface language of the web system to configure C530 IP?
After the connection is established, the Internet browser displays the Login web page.

One of the first tasks when configuring Gigaset C530 IP from the web, will be the language setting of the management system.
You can select the language in which you want the menus and dialogs of the web configurator to appear. In the top field of the Web page, the current language setting appears.
![]() If necessary, click
If necessary, click ![]() to open the list of available languages.
to open the list of available languages.
![]() Select a language.
Select a language.
The Web page is reloaded in the selected language. This may eventually take some time, as the Web pages of the Web configurator for the selected language are loaded into the base station from the configuration server.
![]() In the bottom field of the Web page, enter the system PIN of your phone (delivery status: 0000) to be able to access the Web configurator functions.
In the bottom field of the Web page, enter the system PIN of your phone (delivery status: 0000) to be able to access the Web configurator functions.
![]() Click on the OK button.
Click on the OK button.
Once successfully logged in, the Home Page web page opens with general information about the web configurator.
If you enter an incorrect system PIN, a corresponding message will appear. You will be prompted to
to enter the PIN again.
If you enter an incorrect system PIN again, the PIN field will be locked briefly (appears dimmed). Each time an incorrect PIN is entered again, the duration of the block is doubled.
Notes.
- If the system PIN «0000» (supply setting) is still set on the phone, you will be prompted during login that the device is not secure and that you should change the PIN. You can deactivate this security warning for the following messages by activating the «Do not show this security warning again» option. Click OK to close the dialog box.
- If you do not make any entries for a certain period of time (approx. 10 min.), the session will be automatically closed. The next time you try to enter something or open a web page, the Login web page will be displayed. Re-enter the system PIN to log in again.
- Entries that you have not saved to the phone before logging out will be lost.
automatically.
How to log out of the Gigaset C530 IP web configurator?
The Logout command appears to the right of the menu bar on all pages of the web configurator. Click on Logout to log out of the Web configurator.
Caution:.
Always use the Logout command to end the connection to the Web configurator. If, for example, you close the Web browser without logging out first, access to the Web configurator may be blocked for a few minutes.
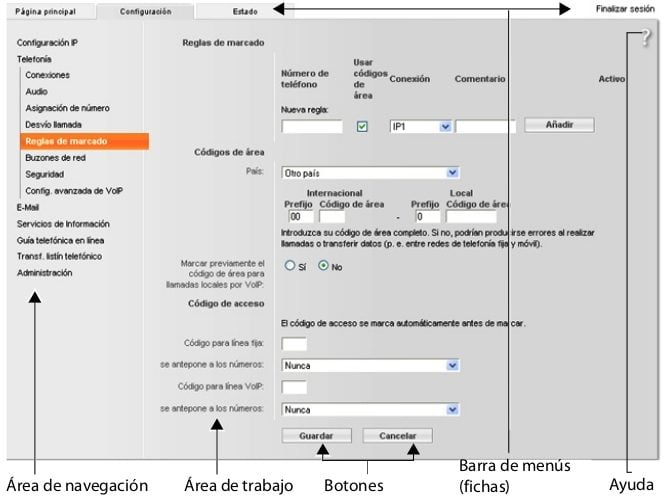
What is the structure of the Web configurator pages for configuring Gigaset C530 IP?
As a guide to configure C530 IP we will show you the functionalities of the system through the different pages of the administrator panel.
The web configurator pages (web pages) contain the items represented in the panel below.
What is included in the menu bar of the Gigaset C530 IP web configurator?
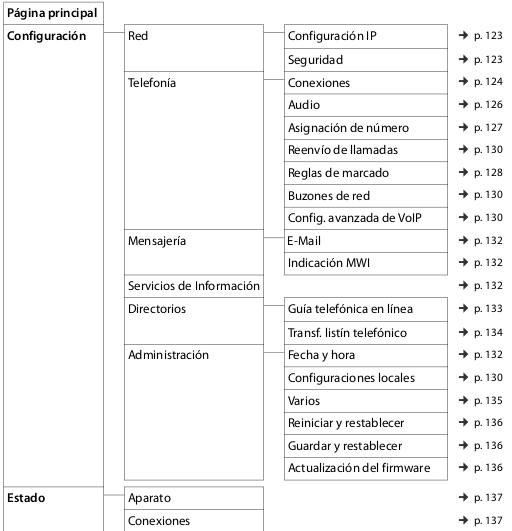
The menu bar presents the web configurator menus in tabbed form. The following menus are available:
- Home page.
The home page opens once you are logged in to the Web configurator. It contains some information about the functions of the Web configurator. - Configuration.
Using the menu you can configure the phone. Clicking on the Settings menu displays the list of the menu functions in the navigation area ( ¢ p. 119). - Settings.
- Status.
The menu provides information about your phone. - Logout.
On the right side of the menu bar you will find, on each Web page, the Logout function.
What do we find in the navigation area of the Gigaset C530 IP web configurator?
The navigation area displays the functions of the selected menu in the menu bar.

If you click on a function, the corresponding page with information and/or fields for the entries opens in the work area.
The selected function is highlighted in orange. In case there are subfunctions of a function, they appear below the function when you click on it (in the example, Telephony).
The page corresponding to the first sub-function appears in the work area (with orange background).
What do we find in the work area of the Gigaset C530 IP web configurator?
In the work area (depending on the function selected in the navigation area) you will see information or dialog fields through which you can make or modify the configuration of the phone.
Make modifications:.
The configuration is made by means of input fields, lists or options.
- A field can have restrictions on the possible values, e.g. maximum number of characters, entry of special characters or certain ranges of values.
- You can open an input field, a list or an option.
- You can open a list by clicking the V button. You can choose between preconfigured values.
- There are two types of options:
– Selection options: in a list you can activate one or several options. Active options are marked with ![]() , non-active options with
, non-active options with ![]() . An option is activated by clicking
. An option is activated by clicking ![]() . The status of the other options in the list remains unchanged. You can deactivate an option by clicking
. The status of the other options in the list remains unchanged. You can deactivate an option by clicking ![]() .
.
– Alternative options (radio button). The active option in the list is marked with ![]() , the non-active ones with
, the non-active ones with ![]() . An option is activated by clicking
. An option is activated by clicking ![]() . The option activated until then is deactivated. An option can only be deactivated if another option is activated.
. The option activated until then is deactivated. An option can only be deactivated if another option is activated.
Accept the changes:
When you have finished making the desired modification to a page, save and activate the new setting on the phone by clicking the Save button.
If the entry in a field does not correspond to the valid rules for this field, you will receive a corresponding message. You can then modify the entry.
Caution:.
Changes that have not yet been saved on the phone are lost if you switch to another Web page or the connection to the Web configurator is terminated, e.g. because the timeout is exceeded.
Buttons:.
Buttons are displayed in the lower part of the work area. Depending on the respective function of a Web page different buttons are displayed. The functions of these buttons are described in the online help of the Web configurator. The most important buttons are:
- Cancel:.
Discard the changes made to the Web page and reload the Web page with the current configuration saved on the phone. - Save:
Save the changes made on the phone to a Web page.
Help:
On most Web pages in the Web configurator there is a question mark at the top right. Click on this question mark to open in a separate window the online help for this Web page.
The help pages are loaded directly from the configuration server.
Note:
In order to view the help pages correctly, you may need to change your browser settings. In the case of Internet Explorer and Firefox, these are e.g. the following settings:.
- Enable active blocked content for help (right-click
of the mouse on the information bar in the header of the browser window) - Enable pages to use own fonts or set Arial font as the standard font.
standard font (general option).
Means of representation in the help:.
- Semi-bold letter:
Interface concepts such as menu functions, names or input fields and options. - [Semibold letter]:
Buttons.
About this help / About this help 
The blue underlined text shows hidden text.
Click once on this «link» and the hidden text will be displayed. The arrow at the end of the link is
is rotated 90°.
If you click on About this help again the text is hidden again. - Telephony > Dialing rules:.
Navigation to a function of the Web configurator.
It corresponds to the representation «Telephony ¤ Dialing rules» in these instructions for use (
instructions for use ( ¤ Open Web pages below) - Search Help:.
Click in the help window and press the Ctrl and F keys. A search dialog opens.
How to distribute the Gigaset C530 IP web configurator menu?
How to connect the base station to the local network (LAN / router) in Gigaset C530 IP?
You can find the functions for LAN connection on the web page: Configuration > IP Configuration.
In most cases no special settings are required for connecting the phone to the router or to a local network. In the delivered state, your phone comes preconfigured with dynamic IP address assignment (DHCP). In order for the router to «recognize» your phone, automatic IP address assignment must also be active in the router, i.e. the router’s DHCP server must be activated.
If the router’s DHCP server cannot or should not be activated, you must assign the telephone a fixed/static IP address ( ¢ p. 54). A static IP address is useful, for example, if port forwarding or a DMZ has been configured for the telephone in the router.
The assignment of a static IP address is also possible via the handset.
Using the Web configurator you can make other settings that are necessary if you connect your phone to a large network (of an entire company or organization) or if you want to remotely administer the Web configurator. You can:
- Set the address of an HTTP proxy server within the LAN, through which the phone can establish connections to the Internet if shortcuts are not allowed on the LAN.
- VLAN Identifier / VLAN Priority to allow access to a tagged VLAN.
- Allow PCs to connect to the Web configurator outside of their LAN.
Attention:.
- Extending access authorization to other networks increases the risk of unauthorized access. For this reason, it is recommended to disable remote access again when it is no longer required.
- Access from other networks to the Web configurator is only possible if the router transmits «out» service requests to port 80 (standard port) of the phone. Please refer to your router’s instructions for use.
How to configure security settings – Manage certificates for TLS authentication for Gigaset C530 IP?
The phone supports the establishment of secure data connections on the Internet with the TLS (Transport Layer Security) security protocol. In TLS, the client (the phone) identifies the server using certificates. These certificates must be stored in the base station.
TLS certificates are managed through the web page: Settings > Network > Security.
On this page you can find the Server Certificates / CA Certificates lists. These contain the certificates saved on the base station. The certificates were already saved on the base station in the delivery state or you have uploaded them to the base station via the Security web page.
In the Invalid certificates list you will find certificates received by servers that have not passed the certificate check during call setup and certificates from the Server certificates / CA certificates lists that are no longer valid (e.g. because they have exceeded their validity date).
You can delete certificates and upload new certificates to the base station, as well as accept or reject invalid certificates.
If communication with a data server on the Internet is not established because the phone does not accept the certificate received from the server (e.g. when downloading your e-mail messages from the POP3 server), you will be prompted to open the Security web page.
The certificate used when establishing the connection is in the Invalid certificates list. View information about the certificate by checking it and clicking the [Details] button. Among other things, it is shown who created the certificate (certification center) and for whom it was created, as well as its validity period.
Based on the information provided, you must decide whether to accept or reject the certificate. If you accept the certificate, it is transferred, depending on the type, to one of the lists Server certificates / CA certificates (even if it has already expired). If a server with this certificate is registered again, this connection is immediately accepted.
If you reject the certificate, it is transferred with the supplement (rejected) to the Server certificates list. If a server with this certificate is registered again, this connection will be rejected immediately.
How to activate/deactivate the Gigaset C530 IP base station?
The connections of your base station can be managed through the web page: Settings > Telephony > Connections.
This web page will display a list of all possible connections and their status (e.g. connected, registered):
- Connection to the fixed telephony network:
You do not need to configure the landline network connection. You can make or receive calls on the fixed network connection as soon as your phone is connected to the fixed network.
You can modify the name of the fixed network connection and the settings for Callback by clicking the corresponding[Edit] button.
The specified name is displayed, e.g., in calls to your fixed network connection, in the display of registered wireless handsets and in the call list.
The flash time is predetermined in the delivery state for operation of the telephone on the main connection. You may have to change it if you connect the phone to a PBX (see the instructions for use of the PBX).
The flash time indicates the duration of the service interruption whose control signals are to be communicated to the PBX or telecommunication installation (call transfer, establishment of a consultation call, etc.).
The connection to Gigaset.net is preconfigured on your phone. Your phone was assigned a Gigaset.net number at the factory.
If you wish, you can activate and deactivate the Gigaset.net connection. If the connection is deactivated, the phone will not register with the Gigaset.net service. In this case, it will not be reachable via the Gigaset.net connection.
Click the corresponding[Edit] button to rename the Gigaset.net connection and disable STUN. By default, a STUN server is used in the Gigaset.net connection.
In the data packets sent, this server replaces the phone’s private IP address with the public IP address. If you use the phone with a router with symmetric NAT, you cannot use the STUN server. You must disable it. In this way, you will not be able to listen to your interlocutors on calls via Gigaset.net.
- IP Connection:
You can assign up to 6 VoIP connections (VoIP phone numbers) to your phone. For each VoIP number you must create a VoIP account with a VoIP provider.
The access data of each account and the corresponding VoIP provider must be saved in the phone. There is a list entry available for each VoIP connection, through which you can configure and manage the connection. To do this, click on the corresponding[Edit] button. [Edit].
How to configure, delete VoIP connections of Gigaset C530 IP?
To configure and delete VoIP connections open the web page: Settings > Telephony > Connections.
Click behind the VoIP connection list entry on the [Edit] button.
A web page will open containing the following areas:
- Automatic configuration
- Download profile
- Provider data
- Supplier data
- General service provider data
- Service provider data
- Service provider network data
Detailed information about the areas can be found in the online help for this web page. The online help will open if you click on the question mark ![]() (at the top right of the Web page). There are different options for setting up a VoIP connection:
(at the top right of the Web page). There are different options for setting up a VoIP connection:
- Some providers support automatic configuration with an automatic configuration code. In this case it is sufficient to enter this code in the Automatic configuration area. All necessary VoIP data is then loaded in the above mentioned areas. The configuration is now complete.
- For most providers, so-called «provider profiles» with general provider data are offered on the configuration server. Select in the Download profile area your supplier and load the supplier profile on the phone. The profile data will be loaded in the Service Provider General Data and Service Provider Network Data areas. Then you will still need to enter your VoIP account data in the Provider data area. In exceptional cases you will have to adapt the settings in the Service Provider Network Data area to the settings of your router:
- If you do not hear your caller on outgoing calls, you may need to switch between outgoing proxy server mode and using STUN. The STUN or outbound server replaces your phone’s private IP address with its public IP address in the data packets sent. If you use the phone with a router with symmetric NAT, you will not be able to use the STUN server.
- If you are temporarily unreachable for incoming calls, you should adapt the value to NAT refresh time:
If port forwarding is not enabled on the router for the phone, nor is a DMZ configured, you will need to add the corresponding record to the NAT routing table (on the router) to make the phone available.
The phone must confirm that it is registered in the routing table at specified time intervals (NAT refresh time) for the record to remain in the routing table.
- For your provider no provider profile is available.
In this case, you must make the settings yourself in the Provider Data, Service Provider General Data and Service Provider Network Data areas.
The VoIP provider will provide you with the necessary data.
How to improve the voice quality of Gigaset C530 IP VoIP connections?
You can find the functions for voice quality improvement in VoIP connections on the web page: Settings > Telephony > Audio.
The sound quality on VoIP connections is mainly determined by the voice codec used in the data transfer and the bandwidth of the DSL connection.
With the voice codec the voice data is digitized (encoded/decoded) and compressed. A «better» codec (improved sound quality) means that more data is transmitted, i.e. a DSL connection with good bandwidth is necessary for the transmission of voice data to work properly.
To influence the quality of communication you can select (taking into account the bandwidth of your DSL connection) the voice codec to be used by your phone and set the order in which codecs should be proposed when establishing a VoIP connection.
The phone has stored standard configurations for the codecs used, one configuration optimized for low bandwidth and another for high bandwidth.
You can generally select one of these standard settings for all VoIP connections on your phone. If your DSL connection has a low bandwidth, you can additionally disregard parallel VoIP connections to increase the voice quality.
You can also make the settings for the voice codecs yourself by selecting for each VoIP connection on your phone which voice codecs are to be used and in which order they are to be proposed during the establishment of a VoIP connection.
The phone supports the following voice codecs:
G.722.
Excellent sound quality. The G.722 wideband voice codec operates at the same bit rate as G.711 (64 Kbit/s per voice connection), but with a higher sampling rate. Thus higher frequencies can be reproduced.
The tone of the voice is clearer and better than in the other codecs (High Definition Sound Performance).
G.711 a law / G.711 μ law.
Excellent sound quality (comparable to ISDN). The required bandwidth is 64 Kbit/s per voice connection.
G.726.
Good sound quality (inferior to that obtained with G.711, but superior to that obtained with G.729).
The phone supports the G.726 codec with a transfer rate of 32 Kbit/s per voice connection.
G.729.
Medium sound quality. The required bandwidth is less than 8 Kbit/s per voice connection.
To achieve additional bandwidth and save transmission capacity, on VoIP connections using the G.729 codec you can suppress the transmission of voice packets during conversation pauses («silence suppression»).
The caller will hear a synthetic sound generated by the receiver instead of the background noise of your environment (option: Enable Annex B of codec G.729).
Note.
For good sound quality you should also consider the following:.
- Avoid engaging in other Internet activities (e.g., surfing the Internet) during VoIP calls.
- Avoid using the Internet during VoIP calls.
- Please note that, depending on the codec used and the network load, delays may occur in voice transmission.
How to assign send and receive connections in Gigaset C530 IP?
For number assignment, open the web page: Settings > Telephony > Number assignment.
Assign send and receive connections to the registered wireless terminals. The following should be noted:
- Each handset is automatically assigned during registration the fixed network connection as a send connection and all base station connections as receive connections.
- You can assign each handset either a fixed send connection or connection selection. In the case of connection selection you will be able to select on each call which connection you want to use.
- Each registered handset has a fixed Gigaset.net number assigned as a forwarding connection. Phone numbers ending in #9 are automatically selected through Gigaset.net.
How to activate a fixed network connection as a replacement sending connection in Gigaset C530 IP?
You can activate the fixed network connection as a replacement connection on the phone. In case the call attempt via VoIP then fails, an automatic attempt (without consultation) to establish the connection via the fixed network will be made.
A replacement connection is used in the following cases:
- Your VoIP lines are busy
- The SIP server of the VoIP connection is not available
- The selected VoIP connection is not yet configured, or its configuration is not correct (e.g. the password is wrong)
- The phone does not have an Internet connection, e.g. because the router is turned off or you do not have an Internet connection
Exception.
SMS that are to be sent over a VoIP connection will not be sent over the alternative connection.
You can find the option for activation of the fallback connection on the web page: Settings > Telephony > Number assignment.
How to configure dialing rules in Gigaset C530 IP?
You can define your own dialing rules in the Dialing Rules area on the Web page: Settings > Telephony > Dialing Rules.
You can set the following dialing rules:
- Set the connection (fixed network connection or a VoIP connection) for certain phone numbers through which dialing will always be performed and, consequently, to which calls will be billed. If you enter only certain digits (e.g. area code, country code or mobile network prefix), all phone numbers beginning with these digits will be dialed via the selected connection.
- You can block certain phone numbers from being dialed via the selected connection.
- You can block certain phone numbers, so that the phone will not establish any connection to these numbers (e.g. numbers beginning with 900 or 902).
The dialing rules apply to all registered wireless handsets. The setting of forwarding connections has no effect on dialing numbers that are subject to a dialing rule.
If desired, you can enable and disable dialing rules.
Note.
Dialing rules, with the exception of a lock, are not effective if you have assigned the connection selection to a screen key on the handset and you select before dialing explicitly a sending connection from the list of available connections.
Tips:
- Compare the rates for long distance calls (especially overseas) from your fixed network provider and your VoIP provider, and specifically state which connection should be used according to countries/locations, e.g. a dialing rule for Telephone number «0033» will affect all calls to France.
- Use dialing rules to determine that calls to numbers beginning with a Call-by-Call number are always made over your fixed network connection. To do this, enter the Call-by-Call number in the Phone number field.
Note.
If several dialing rules overlap, the dialing rule with the closest match will always be applied.
Example:.
There is one dialing rule for the number «02» and a second for «023». Dialing «0231…» will apply the second dialing rule, dialing «0208…» will apply the first one.
Examples.
All calls from the mobile network must be made over the VoIP connection with provider B.
Dialing rules:
Phone number = 017 Connection = IP3, provider B and corresponding records for «015» and «016».
How to set a dialing rule for Emergency Numbers in Gigaset C530 IP?
In some countries, dialing rules for emergency numbers are preconfigured (e.g. for the local police emergency number). The fixed network is configured as Connection.
You should only modify these dialing rules when the phone is not connected to the fixed network. If you select a VoIP connection, make sure that the VoIP provider supports emergency numbers. If the VoIP connection has been removed from the configuration, the emergency call can no longer be made.
If there is no predefined emergency number, you must set up the dialing rules for the emergency numbers yourself and assign them to a connection that you know supports emergency numbers.
How to activate the dialing rule when connecting to a PBX in Gigaset C530 IP?
If the phone is connected to a PBX, you may have to dial a prefix in front of the phone number when making external calls (AKZ = PBX indicator, e.g. «0»).
Save a prefix for the fixed network and VoIP connections respectively and set separately when the prefix is to be prefixed to the phone numbers automatically for VoIP and fixed network connections.
You can choose between «Always», «Never» and «In call lists».
You can find these settings in the Access Code area of the Web page: Settings > Telephony > Dialing rules.
How to activate dialing rule for local calls via VoIP in Gigaset C530 IP?
If you call the fixed network via VoIP, you may have to dial the regional prefix also on local calls (depending on the provider).
You can save entering your own local prefix by registering in the phone settings the full prefix (with the international prefix) of the location where you use your phone and activating the Pre-dial area code for local VoIP calls option. .
You can find these settings in the Area codes area of the web page: Settings > Administration > Local settings.
How to connect/disconnect, register network answering machine in Gigaset C530 IP?
You can find a list of the network answering machines of all connections of your phone on the web page: Settings > Telephony > Network mailboxes.
In this list you can enter the telephone numbers of the network answering machines.
Using this list you can enable or disable the network answering machines of all configured VoIP connections.
How to activate call forwarding for VoIP connections in Gigaset C530 IP?
You can find the settings for call forwarding on the web page: Settings > Telephony > Call forwarding.
You can forward calls to your VoIP connections and to your Gigaset.net number.
You can forward calls made to VoIP connections to an external number of your choice (VoIP, fixed network or mobile network number). The forwarding is done via VoIP.
You can forward calls made to your Gigaset.net number within the Gigaset.net system, i.e. to another Gigaset.net number.
You can define for each VoIP connection (VoIP accounts) whether and when calls should be forwarded to their corresponding VoIP phone numbers.
How to set up DTMF signaling for VoIP on Gigaset C530 IP?
This section of the manual for configuring Gigaset C530 IP is dedicated to explaining the best way to perform DTMF configuration.
The settings for DTMF signaling are made in the DTMF over VoIP connections area on the web page: Settings > Telephony > Advanced VoIP settings.
DTMF signaling is required, for example, for querying and controlling some network answering machines via numeric codes or for remote operation of an answering machine.
For sending DTMF signals via VoIP you must establish how key codes correspond to DTMF signals and how they should be sent, as audible information on the voice channel or in the form of a «SIP information» message. Ask your VoIP provider which type of DTMF transmission is supported.
You can set your phone so that the phone attempts, during each call, to set the appropriate type of DTMF signaling for the current codec (Automatic).
Or set the DTMF signaling type explicitly:
- Audio or RFC 2833 when you want to transmit DTMF signals acoustically (in voice packets).
- SIP Info, if you want to transmit the DTMF signals as a code.
Notes
- The DTMF signaling configuration applies to all VoIP connections (VoIP accounts).
- On wideband connections (G.722 codec is used) it is not possible to transmit DTMF signals acoustically (Audio).
How to configure call forwarding (call forwarding) via VoIP in Gigaset C530 IP?
In this section of the manual for Configuring Gigaset C530 IP, you will learn how to configure call forwarding.
The settings for call forwarding are made in the Call Forwarding area of the web page: Settings > Telephony > Advanced VoIP settings.
You can connect an external call to one of your VoIP connections with a second external caller (depending on the provider). To do this, set up an external consultation with the second party and press the R key on the handset after the second party has answered. The call is transferred.
- You can complete or change the settings for call forwarding as follows:
You can activate call forwarding when hanging up. The two external parties are connected to each other if you press on the handset. Your connections to the other two partners will be terminated.
 - You can activate direct call forwarding. You will then be able to forward the call before the second user has answered.
- You can disable call forwarding with the R key if you want to assign another function to that key (see below «Determining the function of the R key for VoIP (Hook Flash)»).
How to determine the function of the R key for VoIP (Hook Flash) on Gigaset C530 IP?
You can set the function of the R key on the web page: Settings > Telephony > Advanced VoIP settings.
Special features may be supported by your VoIP provider. In order to use such a feature, the phone must send a certain signal (data packet) to the SIP server. You can set this «signal» as R function on the R key of the wireless handsets.
Requirement: The R key is not used for call forwarding (for delivery settings, see above).
Press this key during a VoIP call and the signal will be sent. For this, DTMF signaling must be enabled on the phone via the SIP information messages (see above).
How to set up local communication ports for VoIP on Gigaset C530 IP?
In this section of the manual for configuring c530 IP, we will indicate how to set local communication ports.
You can find the settings for the communication ports on the web page: Configuration > Telephony > Advanced VoIP settings.
The following communication ports are used in VoIP telephony:
- SIP port.
Communication port through which the phone receives signaling data (SIP data). In the delivered state the standard port number 5060 is set for SIP signaling. - SIP port.
- RTP port.
Two consecutive RTP ports (consecutive port numbers) are required for each VoIP connection. Through one port voice data is received and through the other port control data is received. The delivery status is set for voice transmission of the port number range 5004 – 5020.
It is only necessary to make changes to this setting if these port numbers are already occupied by other users on the LAN. In this case, you can set other fixed port numbers or port number ranges for the SIP port and the RTP port.
If several VoIP telephones are to be used on the same router with NAT, it is advisable to use randomly selected ports.
In this case, the telephones should use different ports so that calls and voice data arriving at the NAT router are only transmitted to one telephone (the one for which they are intended).
Set with the Web configurator for the SIP port and the RTP port a range of port numbers from which the ports are to be selected.
How to make settings for accessing Internet services on Gigaset C530 IP?
You can use the following Internet services on your phone.
- Email notifications
In order to use the e-mail function on the handset, you must save the incoming mail server address and your personal access data to your inbox in the base station.
In addition, you can set the time interval at which your handset should check whether new e-mail messages have arrived at the incoming server and set whether authentication at the incoming mail server is to be carried out via a secure connection.
The settings are made on the Web page: Settings > Messaging > E-Mail.
- MWI indication
The LED in the message key of the handsets connected to the base station shows whether you have received any new messages, e.g. a new e-mail message. You can determine for each handset individually which type of newly received messages should be displayed.
The settings are made on the Web page: Settings ¤ Messaging ¤ MWI display.
- Customize information services for Info Center and screensaver Services
You can configure your personal services on the Gigaset.net server for your Info Center and for the Information Services screensaver.
You can find an access to the Gigaset.net server (URL and personal access data) on the web page: Configuration > Info Services.
In addition, you can activate the Information Services screensaver for your phone.
- Online Phone Guides
You will need to select the provider whose online phone books you want to use on registered wireless handsets.
Depending on the selected provider, you can set the Show caller’s name option. This function will cause incoming calls to have the caller’s name read from the online phone book and displayed on the screen – provided there is no entry in the local phone book for this caller’s phone number.
The settings are made on the Web page: Settings > Directories > Online phone book.
- Manage the synchronization of the base station with a time server
In the provisioned state, your phone is set so that it takes the date and time from a time server on the Internet.
Changes to the settings for the time server and activation/deactivation of synchronization are made on the Web page: Settings ¤ Administration ¤ Date and time.
How to load or delete the phonebooks of the wireless handsets from the PC in Gigaset C530 IP?
In the process of configuring C530 IP you will need to load or delete phonebooks from the handset. You can find the functions for editing the phonebooks on the Web page: Configuration > Directories > Phonebook transfer.
The Web configurator offers you the following possibilities to modify the phonebooks of the registered wireless handsets.
- Save phonebooks on a PC. The records are saved in vCard format in a vcf file on the PC. You can upload these files to each registered handset. You can also transfer the phonebook records to your PC address book.
- Transfer contacts from your PC address book to the phonebooks of the wireless handsets. Export the contacts in vcf (vCard) files and transfer them with the Web configurator to the phonebooks of the wireless handsets.
- Transfer the contacts from the PC address book to the phonebooks of the wireless handsets.
- Delete the phonebook on the handset. If you have edited e.g. the phonebook file (vcf file) on the PC and want to load this modified phonebook on the handset, you can delete the current phonebook on the handset before the transfer.
Tip: Make a backup copy of the current phonebook before deleting the phonebook on the PC.
on the PC. This way you will be able to reload it again in case it is not possible to partially or fully load the modified phonebook due to
partially or completely due to formatting errors in the handset.
wireless terminal.
Note.
If you want to add a phone book saved on the PC (vcf file) with multiple entries to the Microsoft OutlookTM address book, the following should be noted:
Microsoft OutlookTM adds only the first record (from the phonebook) from the vcf file to your address book.
Transfer rules.
Records loaded from a vcf file into the wireless terminal will be added to the phonebook. If a record already exists for a name, it will be supplemented if necessary or another record will be created with the name. No phone numbers are overwritten or deleted.
Note.
Depending on the device type, up to 3 records with the same name are created per vCard in the phone book: for each entered number one record.
How to change the configuration of the base station and register Gigaset C530 IP wireless handsets?
To configure Gigaset C530 IP, using the web configurator you can:
- Enable registration mode on the base station to register other handsets to the base station. This setting corresponds to the long press of the registration/paging key on the front of the base station.
- Enable or disable Eco Mode or Eco+ Mode. For Eco Mode, see p. 101.
- Changing the system PIN ( ¢ p. 53) of your phone.
- Turn on and off the LED indicator on the registration/paging key on the front of the base station. For the meaning of the LED indicator, see p. 3.
- Enable/disable the display of VoIP status messages on the handset.
You can find the base station settings on the Web page: Settings > Administration > Miscellaneous.
How to reset the Gigaset C530 IP or reset to factory default?
It may happen that after configuring Gigaset C530 IP you need to reboot the handset or reset it to supply status. In case your phone ever does not work as usual, you can reboot it. In most cases this usually solves the problem.
You can also reset all phone settings to the delivery state, e.g. if you transfer the phone to other people. This deletes all settings, lists and phone book entries.
You can reset the device or reset the settings to the delivery state via the web page: Settings ¤ Administration ¤ Reset and reset.
How to save and retrieve the system configuration in Gigaset C530 IP?
In the process of configuring Gigaset C530 IP, once the base station configuration is completed and after each configuration change you can save the current configuration of the base station to a file on the PC (.cfg extension).
If you change the configuration accidentally or if the base station has to be reset (rebooted) due to an error, you can load the saved configuration from the PC file back into the handset.
The .cfg file contains among others:
- The settings of the local network (IP configuration),
- The data of the configured (VoIP) connections,
- Assignment of the receive/send connections,
- Local prefix own prefixes,
- The network answering machine number,
- Configuration for Internet services,
- ECO DECT configuration,
You can save and recall the system settings via the Web page: Settings > Administration > Save and restore.
How to update the base station firmware / reset firmware updates, enable/disable automatic updates on Gigaset C530 IP?
You can initiate updates and changes to previous firmware versions on the web page: Configuration > Administration > Firmware update.
Updates of the base station firmware and provider profiles for your VoIP connections (general provider data) will be available on a configuration server on the Internet on a regular basis.
If necessary, you can upload these updates to your base station. The URL of this server is stored in the base station.
The following possibilities are available to you:
How to start the firmware update on Gigaset C530 IP?
If a new firmware version is available, it will be loaded into the base station and the base station will start again. A firmware update takes approximately 6 minutes. The duration also depends on the bandwidth of your DSL connection.
How to activate/deactivate the automatic version check in Gigaset C530 IP?
With the version check activated, the phone checks daily whether new versions of the phone’s firmware are available on the Gigaset configuration server.
If at the time of the check the phone is not connected to the Internet (e.g. because the router is disabled), the check will be performed when the phone reconnects to the Internet.
If a new version is available, a corresponding warning will appear on the display of the registered wireless handsets. You can start the firmware update on one of the handsets.
How to reset the firmware in Gigaset C530 IP?
The following possibilities are available:
– You can reload the firmware version loaded in the previous base station update back into the handset.
– You can reload the firmware version loaded in the delivery state of the base station back to the handset.
The selected firmware is reloaded into the phone and the current firmware is overwritten.
How to modify the port numbers for SIP and RTP in Gigaset C530 IP?
If during the process to configure Gigaset C530 IP you need to modify the port numbers for SIP and RTP, this section will be very useful for you.
For SIP and RTP ports, define other (local) port numbers on the VoIP phone (between 1024 and 49152), which:
- do not use for another application or host on the LAN, and
- that are different from the SIP and RTP port numbers commonly used (and preconfigured on the phone)
This process is especially useful if multiple VoIP phones are connected to the router.
How to change the Gigaset C530 IP SIP and RTP communication port numbers?
When configuring C530 IP, you may need to know how to change the SIP and RTP communication port numbers. Follow the steps below:
> Access with your PC browser to the phone’s Web configurator and log in.
> Open the Configuration > Telephony > Advanced VoIP settings web page and change the SIP and RTP port settings.
To make it easier to remember the new port numbers (e.g. for router settings), you can choose port numbers very similar to the standard settings, for example:
SIP port 49060 instead of5060.
RTP Port 49004 to 49010 instead of5004 to 5010
> Save the changes on the phone.
> Wait until the new active VoIP connection is re-registered. To do this, access the Settings > Telephony > Connections web page, where the Status of your VoIP connections will be displayed.
> Check if the original problem persists. If the problem persists, carry out step 2.
How to configure port forwarding on the router to configure Gigaset C530 IP?
In order to be able to use the selected SIP and RTP port numbers also on the WAN interface with public IP address, you must define port forwarding rules in the router for SIP and RTP ports.
Define port forwarding on the router:.
The nomenclature used may vary depending on the router.
For port forwarding you should use the following data (for example):

- Protocol.
Set UDP as the protocol used. - Public port.
Port number/port number range of the WAN interface
- Protocol.
- Local port.
Port numbers defined in the phone for SIP and RTP ports.
In the new firmware version of Gigaset VoIP phones you can set a range of RTP ports. Then it will be necessary to define port forwarding corresponding to that range in the router. - Port forwarding for SIP and RTP ports.
- Local Host (IP).
Local IP address of the phone on the LAN. The current IP address of the handset will appear on the handset display if you press the paging key on the base station.
- Local port.
In order for the router to perform this port forwarding, the router’s DHCP settings must ensure that the same local IP address is always assigned to the handset.
That is, DHCP does not change the IP address assigned to the phone while it is in operation. Or, assign a fixed (static) IP address to the phone. Make sure that this IP address is not in the address range reserved for DHCP and that it has not been assigned to any other parties on the LAN.
What are the VoIP status codes in Gigaset C530 IP?
To configure Gigaset C530 IP, it will be very useful for you to know the VoIP status codes that we will indicate below to be able to interpret them:
0x31 IP configuration error: IP domains not registered.
0x33 IP configuration error: SIP username (Authentication name) not registered.
Displayed, for example, when dialing with line suffix, when no connection has been configured on the base station for the line suffix.
configured for the suffix.
0x34 IP configuration error: SIP password (Authentication password) not registered.
0x300 Call recipient is available on multiple dial-up connections. If supported by the
VoIP provider supports it, a list of telephone lines is transferred together with the status code. The caller can
The caller can select with which line he/she wants to establish the connection.
0x301 Permanent forwarding: The called party is no longer available on this telephone number. The new number is transmitted to the phone together with the status code and henceforth the phone will no longer use the old number, but will dial the new address.
0x302 Temporary forwarding: The telephone is notified that the called party is not available at the dialed number.
The duration of the divert is temporarily limited. The duration of the divert is additionally
additionally notified to the phone.
0x305 The request is forwarded to another «proxy server» to, for example, share the load of queries.
The phone will again make the same request to another proxy server. This is not an address forwarding per se.
0x380 Other service: The request or call could not be forwarded. However, the telephone is informed what other possibilities there are for placing the call.
0x400 Unsuccessful call.
0x401 Not authorized
0x403 VoIP provider does not support the requested service.
0x404 Incorrect phone number: A connection cannot be established with this number.
Example: on a city call, you do not dial the area code even though your VoIP provider does not support city calls.
0x405 Method not allowed.
0x406 Not acceptable: The requested service cannot be provided.
0x407 Proxy authentication required.
0x408 The caller is unreachable (e.g. account has been deleted).
0x410 The requested service is not available from the VoIP provider.
0x413 The message is too long.
0x414 URI too long.
0x415 Request format is not supported.
0x416 Incorrect URI.
0x420 Incorrect termination.
0x421 Incorrect termination.
0x423 VoIP provider does not support the requested service.
0x480 The number you have called is temporarily unavailable.
0x481 The called party is not available.
0x482 Double service request.
0x483 Too many «hops»: The request made is rejected because the service server (proxy) determines that it has already passed through too many service servers. The original sender of the request defines this maximum amount beforehand.
0x484 Wrong phone number: In most cases this response means that you have simply forgotten one or more digits of the phone number.
0x485 The URI being called is not unique, so the VoIP provider cannot process it.
0x486 The called party communicates.
0x487 General error: The call was dropped before it could be established. The status code confirms receipt of the
reception of the cancellation signal.
0x488 The server cannot process the request because the data specified in the media description are not supported.
are not supported.
0x491 The server notifies that the request will be processed as soon as it has finished processing a previous request.
previous request.
0x493 The server rejects the request because the phone cannot decode the message. The sender
has used an encryption method that the server or the receiving phone cannot decrypt.
0x500 The proxy or remote station has detected an error in the execution of the request that makes it impossible to continue execution. The caller or the telephone indicates, in this case, the error and will repeat the request after a couple of seconds. If applicable, the other party informs the caller or the telephone after how many seconds the request can be repeated.
0x501 The recipient cannot process the request because they do not have the functionality requested by the caller. In case the recipient understands the request but does not process it because the caller does not have the necessary rights or because the request is not allowed in the current context, instead of code 501 code 405 is sent.
0x502 The remote station sending this error code is, in this case, a proxy or gateway that has received an invalid response from the gateway through which this request was to be processed.
0x503 At this point, the remote station or proxy is unable to process the request because the server
is overloaded or maintenance is being performed on the server. If there is a possibility that the request may be repeated within a foreseeable time interval, the server notifies the caller or telephone.
0x504 Gateway timeout.
What problems can arise when configuring Gigaset C530 IP?
In this section of the manual to configure gigaset c530 ip, we will address some problems that may arise during configuration and how to solve them:
What do I do if nothing is visible on the Gigaset C530 IP screen?
1. The handset is turned off.
> Press ![]() prolongedly.
prolongedly.
2. The battery is discharged.
> Charge or replace the battery.
3. The screen/keypad lock is activated.
> Long press the ![]() key.
key.
4. The display illumination is disabled because a timer system has been activated.
> Press any key on the handset to temporarily activate the display illumination.
Or:
> Deactivate the timer system.
What do I do if the Gigaset C530 IP display is flickering?
If the Gigaset C530 IP display without a base flashes:
1. he handset is out of range of the base station.
> Reduce the distance between the handset and the base station.
2. The base station is switched off.
> Check the power supply of the base station.
3. The range of the base station has been reduced because ECO DECT has been activated.
> Deactivate the Echo mode or reduce the distance between the handset and the base station.
4. Firmware update in progress.
> Wait until the update is completed.
What do I do if Gigaset C530 IP does not ring?
1. The ringer is turned off.
> Activate the call ringing.
2. Call forwarding is set to «All calls».
> Deactivate call forwarding.
3. The connection to which the call is coming is not assigned to the handset as a receiving connection.
> Change the assignment of the receiving connections.
What do I do if no ring tone or dial tone is heard from the Gigaset C530 IP fixed network?
The supplied telephone cable has not been used or is defective.
> Replace the telephone cable. If purchased from a specialist dealer, check the correct pin assignment.
What do I do if some of the Gigaset C530 IP network services do not work?
Service functions not activated.
> Request information from your network provider.
What do I do if I get an error tone after entering the system PIN in Gigaset C530 IP?
The system PIN you have entered is wrong.
> Re-enter the system PIN.
What do I do if I cannot hear the other party with Gigaset C530 IP?
You have pressed the mute key ![]() . The handset is «muted».
. The handset is «muted».
Activate the microphone again.
What do I do if the caller’s number is not displayed on Gigaset C530 IP?
1. Phone number transmission (CLI) is not enabled for the caller.
> The caller should ask his network provider to activate the transmission of his phone number (CLI).
(CLI).
2. The network provider does not support the indication of the caller’s telephone number (CLIP) or does not have that option available.
has this option available.
Request the activation of the CLIP from your network provider.
3. Your telephone is connected via a PBX or a router with an integrated PBX (gateway) that does not transmit the entire caller number (CLIP).
gateway) that does not transmit all information.
Restart the device: Briefly unplug the device. Plug it in again and wait for it to restart.
> Check the configuration in the PBX and, if necessary, activate the telephone number display.
the telephone number display if necessary. To do this, look in the operating instructions for the device for terms such as CLIP, telephone number transmission, phone number display
phone number transmission, phone number display, etc. or consult the device manufacturer.
What do I do if I hear an error tone when entering data on the Gigaset C530 IP?
When an error tone (descending succession of tones) is heard when entering data, we must proceed as follows:
Failed operation/incorrect data entry.
> Repeat the process. Observe the display and refer, if necessary, to the operating instructions.
What do I do if the Gigaset C530 IP call list does not show the time of a message?
The date and time have not been set.
> Set the date and time, or
> Activate synchronization with a time server on the Internet via the Web configurator.
What do I do if the Gigaset C530 IP does not run the firmware update or download the VoIP profile?
1. If the display shows Not available at this time!, it is possible that the VoIP lines are busy or a download/download is in progress.
or a download/upgrade is in progress.
Repeat the operation at a later time.
If the display shows Cannot read file, the firmware file may be invalid.
Please use only firmware that is available on the Gigaset predefined configuration server.
Please use only firmware that is available on the predefined Gigaset configuration server.
If the display shows Server not available!, the download server cannot be accessed.
> The server is currently unavailable. Repeat the operation later.
> You have changed the address of the predefined server. Correct the address. If necessary, restart the base station.
If necessary, restart the base station.
4. If the display shows Transfer error. XXX, it means that an error occurred during the file transfer. For XXX an HTTP error code is displayed.
> Repeat the operation. If the error occurs again, contact customer service.
5. If Check IP settings! appears on the screen, your phone may not have an Internet connection.
to the Internet.
Check the cable connections between the base station and the router, as well as between the router and the Internet.
and the Internet.
> Check that the phone is connected to the LAN, i.e. that it can be accessed via its IP address.
its IP address.
What do I do if I cannot establish a connection between Gigaset C530 IP and my PC’s Web browser?
> Check the local IP address of the phone entered when establishing the connection. You can check the
IP address on the handset.
> Check the connections between the PC and the base station. Enter, for example, on the PC a command
ping command for the base station (ping <local IP address of the base station).
You have tried to access the phone via secure http (https://…). Try again with http://….
******
So much for this manual for Configuring Gigaset C530 IP with everything an administrator needs to know to get the most out of this VoIP phone.
As we indicated at the beginning of this complete manual to configure C530 IP, this is a complex guide for administrators who perform a configuration mostly through web panel.
If you want to know how to handle this Gigaset at user level, we recommend you consult our Gigaset C530 IP manual.
We have an administrator and user manual for each phone model, see our support area for more information!